
Features overview

info

This article covers AdGuard for Mac, a multifunctional ad blocker that protects your device at the system level. To see how it works, download the AdGuard app
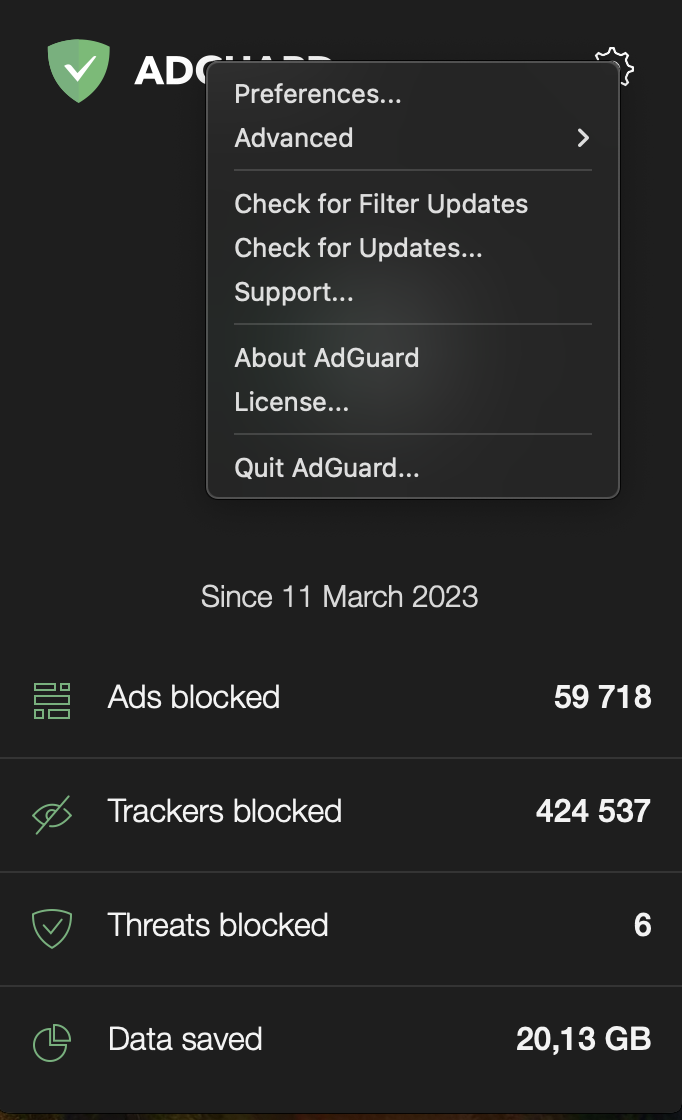
AdGuard for Mac, as one of our main staples, merits a full how-to guide. We decided to help new users out and to highlight some finer, but less obvious points that even seasoned AdGuard for Mac fans might have been missing.

AdGuard for Mac is a standalone ad blocker for macOS. While AdGuard for Safari is limited in ad-blocking capabilities due to Safari Content Blocking, AdGuard for Mac is full-fledged and can offer more to its users. Let us walk you through the main features.

Home panel

Home panel *mobile

The first thing you see upon startup will be a screen with a big On/Off toggle. Below are shown various stats (ads blocked, trackers blocked, data saved) since the installation or since the last stats reset.

To start configuring AdGuard for Mac, you need to click the gear in the upper right corner of the window and select "Preferences".

General Preferences

General

Descriptions under option titles seem self-explanatory, but still:

Activate language-specific filters automatically Enabling this option, you won't have to manually choose all the filters when visiting a foreign website, saving you some time.

Launch AdGuard at login A simple and convenient feature with which you don't have to worry whether or not you have your ad blocker turned on, and just be sure that ads are always blocked.

Do not block search ads and websites' self-promotion This option might be useful to online shoppers: instead of adding all your favorite e-shops and sites to the Allowlist, you can simply exclude self-promos and search ads from filtering. AdGuard will automatically detect those and let them be, while removing everything else ad-like.

Hide menu bar icon If you don't want to see the menu bar icon, there is an option to hide it. But don't worry: even if you remove it from the menu bar, AdGuard will continue to run in the background.

From this same window you can access the above-mentioned Allowlist, to which you can add websites you do not wish AdGuard to filter. Just click the corresponding button located at the bottom of the window.

Filters

Filters

Filters are the main driving force behind the Ad blocker module. To understand how filtering works, get acquainted with our comprehensive article. But in essence, filter lists are sets of rules written in a special language, and your ad blocker is an interpreter of these rules who then implements them. As a result, you stop seeing ads on your web pages and life gets lots better.

Some filter lists (AdGuard’s Base filter, Annoyances filter, EasyList, etc.) are pre-installed, while other specific ones, adapted to your preferences, can be downloaded additionally and added to your program.

Aside from the more general and universally applicable filters (like Base filter), AdGuard provides an extensive quantity of filters for every occasion:

  • filters aimed at tracking prevention (like Tracking Protection filter),
  • language-specific ad filters that block content in a selected language,
  • Social media filter that removes "Like" and "Share" buttons,
  • Annoyances filter for cookie warnings, in-page pop-ups and others of the same ilk,
  • and even a filter that unblocks some ads instead of blocking them — Filter for search ads and self-promotions.

AdGuard filters are automatically updated. Our developers create them all based on user feedback received. You can always help other AdGuard users (and yourself, in perspective) by sending us reports right from the app's Assistant (it's really handy, we'll tell you more about the Assistant further on), or from the website. If you wish to know more about AdGuard filters, here is some info.

User rules

User rules

Another vital part of the Ad Blocker module are its User rules. If you have some coding experience and would like to create your own rules that would be a better custom fit than the standard filters already available, then you can try your hand at this. The syntax AdGuard uses for its filtering rules is based on that of any other ad blocking extension, but with considerable additions, extending its possibilities. The whole process of rule-writing in all its nuances is described in these comprehensive instructions, so if you want to write some custom rules and check how much of a coder you are, just follow the steps we described in this article.

DNS

DNS

DNS filtering is one of the most useful features, thanks to which all your DNS traffic is encrypted. But if you're using the default DNS server provided by your ISP, your DNS traffic is likely not encrypted and vulnerable to snooping and hijacking.

In the DNS panel you can select the DNS servers from known DNS providers or even add custom DNS servers. Also you can add domains to DNS blocklist or allowlist and add complicated rules using DNS rule syntax. Finally, you can add DNS filters of your choice.

Stealth Mode

Stealth Mode

This module is a very useful tool that will help you maintain your privacy from websites that try to retain such info about you as your IP address, computer parameters, browser settings and even the initial page from which you were redirected, not to mention cart contents if we speak of web stores. If this list of info potentially to be shared with shady third parties doesn't make you think twice, then might we add that in most cases they will also get such personal data as your age, yearly income, medical history, physical address and your kids' names. Eliminating such things as unwanted cookies or clandestine insertion of tracking parameters into your browser is what Stealth Mode does best.

Stealth Mode contains a wide range of options, which ensure its flexible configuration. They are divided into several categories, and for an unprepared user many of them will seem confusing and maybe even complicated. We provided each option with a hint to make up for the deficiency — hints appear when you hover over the icon with a question mark. If you still wish to know more about the whole concept, we encourage you to proceed to this article.

Browsing Security

Security

Next we have the Security panel, where a module also known as Browsing Security is located. What it does is protection from malicious and phishing websites.

note

AdGuard is not an antivirus, but an entirely different program. It will show you a warning if you are about to go onto an infected domain, but it cannot stop you from downloading anything suspicious or help you deal with already existing viruses. Phishing is a very common web fraud aimed at stealing personal data (passwords, bank account details, etc.). It is carried out using fake web pages mimicking popular websites or real services, such as web stores or social networks. Many phishing websites have URLs that only differ from the real ones in just a few symbols to put you off your guard. If a user enters their details on such a website, they’ll definitely end up in the wrong hands.

Browsing Security gives strong protection against such incidents. At the same time, the user’s personal information is not transferred anywhere, and AdGuard servers do not know which websites the user is visiting, because the security check is not performed via open web address (URL) but through hash prefixes (hash is a certain data structure that renders each address added to the base unambiguous).

Some web pages are not malicious themselves, but they may contain elements built into their structure by other websites. Unlike browser plug-ins, Browsing Security module checks each object built into any web page, ensuring maximum protection.

If you wish to help us in perfecting this module, you can check the lower box on the panel near the "Help us with Browsing Security filters development" phrase. This will enable your computer to send us pertinent info on fraudulent websites you might stumble upon while surfing the web — and our developers will make sure they end up locked at the bottom of your ban list.

Browser Assistant

Assistant

AdGuard Browser Assistant’s primary function is to manage filtering directly from the browser. It used to be a mere userscript incorporated into AdGuard for Mac app that then became a full-fledged browser extension. Know more about the benefits it yields.

Assistant popup menu *mobile

You will be prompted to install the Browser Assistant for your default browser when you first install AdGuard (during the onboarding process). If you missed it, you can download it for any browser at any time.

Extensions

Extensions

Extensions are small programs that do exactly what their name implies — they extend functionality. And AdGuard uses several extensions of its own, also called userscripts, to broaden its functions range:

1. AdGuard Assistant (legacy version) This extension assists the user in changing basic AdGuard settings within the browser, without the need to open the app itself. Like Browser Assistant, legacy Assistant works with all macOS compatible browsers. Thanks to this little tool you can do several things without having to leave the browser: add a certain webpage to the "do not block" list, choose and block an especially annoying element on the page, report the website if it still manages to get ads through to you.

note

This version of Assistant is legacy and there is no point in using it on new systems, since it has been replaced with the full-fledged Browser Assistant. But legacy Assistant might be of help if there is no Browser Assistant extension for your browser.

2. AdGuard Extra This extension is used to solve the more complicated ad blocking cases you might encounter. We would recommend you to always keep it switched on, unless you have a serious reason not to.

3. AdGuard Popup Blocker Prevents all these annoying popup windows from opening when you view webpages. Blocks popup ads on web pages.

One of the important features of AdGuard for Mac is that the application can work as a cross-browser userscript manager. You can easily add any scripts you like and manage existing ones without having to switch browsers every time.

Network

Network

This last panel is dedicated to Network filtering, and you will find extra functionalities here. We do recommend to enable the first two ones: "Automatically filter applications" and "Filter HTTPS protocol". Those are an important added precaution to better filter your web space. HTTP is the primary protocol for transmitting information over the Internet. Most data including ads is transferred via it, but it has one disadvantage — the connection is unencrypted. Thanks to the HTTPS filtering feature AdGuard has, not only HTTP traffic is filtered, but also HTTPS traffic (S stands for ‘secure’).

There are also the options of "Do not filter websites with EV certificates" and "Use AdGuard as an HTTP Proxy". Extended Validation (EV) SSL Certificates offer a stronger safety guarantee; owners of such websites have to pass a thorough and globally standardized identity verification process defined by EV guidelines. Which is the reason why some users trust websites with such certificates and prefer not to filter them.

As for the second option — well, yes, in fact you can use AdGuard as a regular HTTP proxy server. All traffic coming through it will be filtered. This proxy will also be available on your local network, so you may use it for traffic filtering on other devices that are able to reach the proxy directly. To filter traffic on another device connected to proxy you will need to install an AdGuard root certificate there. After you configure proxy, open your browser and go to this page.

Others

There are other useful AdGuard options that shouldn't go unnoticed in this article, since they add much to user experience.

License

First, there's the License tab that you can open from the dropdown main menu (the one that opens once you click the gear icon on the upper right of the main window). From this tab you can see which license type you are using, check its status and validity period.

License

In this same tab you can refresh your license status, renew your license or reset the license key using the corresponding buttons.

Support

Click the gear icon in the upper right corner, select "Support", and you will be able to send a bug report or a feature request to our support team. Be sure to add your real actual email though, because without it the message won't be sent.

Support

To report a missed ad or a broken website, please follow the link above the message window, we use a separate reporting tool for those types of issues.

It is possible to attach a diagnostic report to your message, you only need to check the box in the lower part of the tab.

Updates check

Last but not least. You can check for filter and program updates by clicking the corresponding menu options in the dropdown menu (click the gear icon and you'll see it).